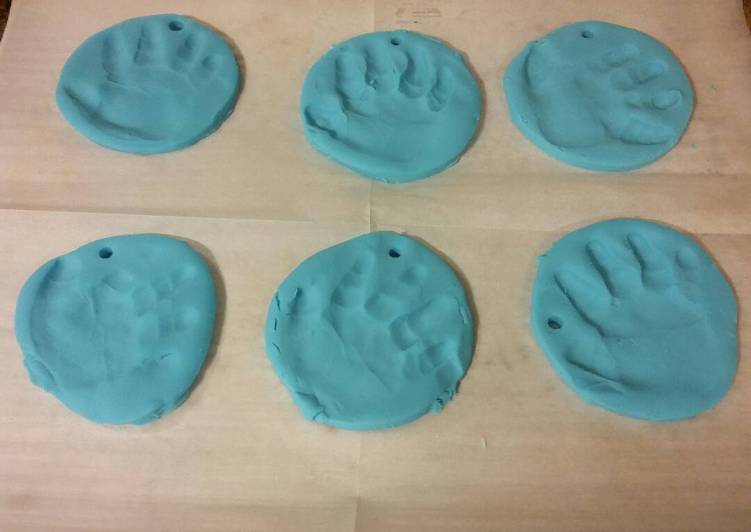
Simple Way to Prepare Perfect Better than Salt Dough Holiday Ornament Clay
By Dennis Taylor07 June 2020
Simple Way to Prepare Perfect Better than Salt Dough Holiday Ornament Clay
Hello everybody, welcome to our recipe page. Today I will show you a way to prepare a distinctive dish, Better than Salt Dough Holiday Ornament Clay. This is one of my favourite food recipe, this time i’am gonna make it a little bit tasty. This will be really delicious.
Better than Salt Dough Holiday Ornament Clay Recipe. Christmas, Crafts, Holidays, Kids Crafts and Coloring. "This post contains affiliate links. I bet you're here for the Better Than Salt Dough, Homemade Clay recipe, right?
You can have Better than Salt Dough Holiday Ornament Clay using 4 ingredients and 10 steps. Here is how you achieve it.
Ingredients of Better than Salt Dough Holiday Ornament Clay
Prepare 1 cup of baking soda.
Prepare 1/2 cup of cornstarch - lightly packed.
You need 3/4 cup of water.
You need of Optional - gel food coloring and/or glitter.
It's much better than salt dough and super simple to make.Perfect for Christmas ornaments or hand prints.As part of my holiday craft to-do list, I decided.Cold porcelain because this homemade clay looks like it when it'.
Better than Salt Dough Holiday Ornament Clay step by step
In a medium saucepan over medium-low heat use a rubber spatula/scraper to stir together baking soda, cornstarch, and water until combined..
Heat until consistency resembles thin mashed potatoes, stirring constantly. Remove from heat and continue stirring until consistency is like a soft putty..
Transfer mixture to a medium sized mixing bowl. Cover directly with plastic wrap. Let sit until completely cooled..
Once cooled turn clay out onto a smooth surface and knead until smooth. Add additional cornstarch if clay is too sticky/wet..
Preheat oven to 200°F. Line a baking sheet with parchment paper. Roll out dough to 1/4" thick. Use cookie cutters to make desired shapes..
Place pieces on baking sheet, poke a hole in the top of each piece with a skewer or drinking straw so you can thread ribbon/string through for hanging when done..
Bake in oven until pieces are dry and hardened, usually takes about 1 hr at 1/4" thick. Be sure to flip pieces over halfway through baking for even drying..
Let cool completely on baking sheet. Decorate as desired..
See note below ⤵.
Note: To make ornaments colored before baking add desired amount of food coloring (in any color you want) to water before mixing with baking sold and cornstarch. To make glittery ornaments, add glitter while kneading..
Oh, and it doesn't make your hands itchy and dry either…Check it out and give it a go… These salt dough ornaments use sea glass for a festive green look.If you don't have easy access to the beach to collect your own sea glass, fear not: just adapt the Get the pets involved in the holiday festivities!These adorable salt dough ornaments are easily sculpted to look like melting snowmen.
Making your own holiday ornaments is not only fun, but frugal as well.You can dress them up as much or as little as you like to suit your own personal tastes and the best part is you never have to brave the dreaded ornament aisle at local big.Learn how to make salt dough ornaments, salt dough handprints, and cut out shapes to play This method is straight forward, easy, and thorough—and they a perfect kids holiday gift for This salt dough is a staple of childhood and I love doing this Christmas activity with my kids each year—and.Salt dough ornaments are a fun and easy DIY Christmas decoration.Your kids will love creating this classic holiday craft—and The best part about these tiny ornaments is that you can decorate them however you like.